概述:
Room是Google在AndroidX中提供的一个ORM(Object Relational Mapping,对象关系映射)库。它是在SQLite上提供的一个抽象层,可以使用SQLite的全部功能,同时可以更好更便捷流畅地访问数据库。(关于AndroidX可以参考,Android_AndroidX简介&Junit4:https://www.cnblogs.com/fanglongxiang/p/11401123.html)
推荐使用Room而不是直接使用SQLite,官方的说明如下:
应用程序处理大量结构化数据 从本地持久化数据中处理是最好的。最常见的用例是缓存相关的数据片段。这样,当设备无法访问网络时,用户仍然可以在离线时浏览该内容。任何用户发起的内容更改都将在设备重新联机后同步到服务器。
Room的架构和组成:
Room主要由下面3部分组成,这里简单说明下,后面会详解。
DataBase:包含数据库容器,并作为到应用程序的持久关系数据的底层连接的主要访问点。
通过注释@Database实现,并要继承RoomDatabase。具体见下面例子中的StudentDataBase。
Entity: 实体,相当于数据库中的表,对应表中的字段。
DAO: data access objects,简称DAO,数据库访问对象,包含了访问数据库的方法。
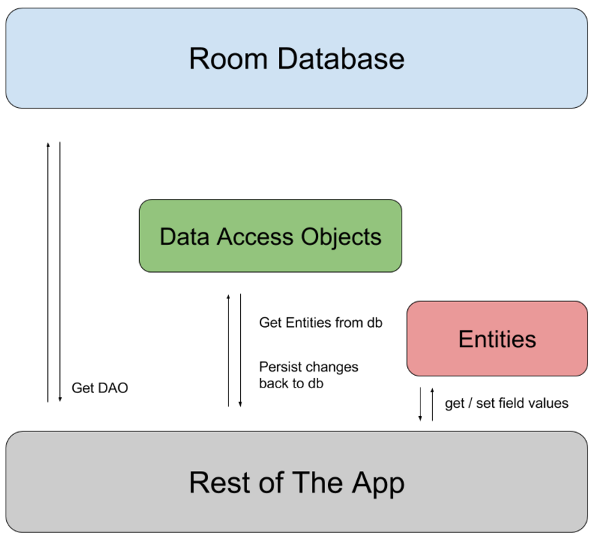
应用通过RoomDatabase获取与之关联的DAOs,然后通过DAO从数据库中获取实体(Entity)并保存相应修改到数据库中,Entity是用来获取或设置数据库的表中对应字段的值。下面是对应的结构图:

下面先举一个小示例,大致了解下 Room数据库的增删改查 流程(代码中添加了说明注释,可以详细看下);然后再详细说明知识点。
要使用Room,首先要加载依赖build.gradle(Module:)添加如下(最新信息从这里获取 https://developer.android.google.cn/jetpack/androidx/releases/room#declaring_dependencies):
dependencies {
  def room_version = "2.2.0-beta01"

  implementation "androidx.room:room-runtime:$room_version"
  annotationProcessor "androidx.room:room-compiler:$room_version" // For Kotlin use kapt instead of annotationProcessor  // optional - Kotlin Extensions and Coroutines support for Room
  implementation "androidx.room:room-ktx:$room_version"

  // optional - RxJava support for Room
  implementation "androidx.room:room-rxjava2:$room_version"

  // optional - Guava support for Room, including Optional and ListenableFuture
  implementation "androidx.room:room-guava:$room_version"

  // Test helpers
  testImplementation "androidx.room:room-testing:$room_version"}
首先,创建一个实体Entity,这里创建一个叫Student的实体(它对应一个名叫students的表,表中3个字段id, student_name, age),代码如下:
package com.flx.testroom;import androidx.room.ColumnInfo;import androidx.room.Entity;import androidx.room.PrimaryKey;//@Entity注释一个实体 tableName 数据库中的表名@Entity(tableName = "students")public class Student {    //主键 自增    @PrimaryKey(autoGenerate = true)    public int id;    //student_name才是真正在表中对应的字段名,name是该对象中的变量。    @ColumnInfo(name="student_name")    public String name;    public int age;    public Student() {

    }    public Student(String name, int age) {        this.name = name;        this.age = age;
    }    public int getId() {        return id;
    }    public void setId(int id) {        this.id = id;
    }    public String getName() {        return name;
    }    public void setName(String name) {        this.name = name;
    }    public int getAge() {        return age;
    }    public void setAge(int age) {        this.age = age;
    }
}
然后,创建一个名为StudentsDao的DAO,代码如下:
package com.flx.testroom;import java.util.List;import androidx.room.Dao;import androidx.room.Delete;import androidx.room.Insert;import androidx.room.Query;import androidx.room.Update;@Daopublic interface StudentsDao {    @Insert//增    public void insertStudent(Student student);    @Insert    public void insertStudents(Student student1, Student student2);    @Insert    public void insertStudentsAndMore(Student student, List<Student> classmate);    @Update//改    public void updateStudents(Student ... students);    @Delete//删    public void deleStudents(Student ... students);    @Query( "SELECT * FROM students" )//查    public Student[] getAllStudents();    @Query( "SELECT * FROM students WHERE student_name LIKE:studentName" )//带参数    public Student[] getStudentsByName(String studentName);

}
最后创建数据库类StudentDataBase,
StudentDataBase
接下来看如何调用,运行后的现象和结果。 这里编写的是一个运行在Android设备上的JUnit测试。
为了能看到具体数据库,这里创建数据库使用持久化的方法,databaseBuilder,下面有详细说明。
(关于Junit测试可以参考,Android_AndroidX简介&Junit4:https://www.cnblogs.com/fanglongxiang/p/11401123.html)
   setUp() =
        studentDb = Room.databaseBuilder(context, StudentDataBase., "studentDB"
        studentsDao =  tearDown()  <Student> listStudents =  ArrayList<>=  Student("insert1", 20=  Student( "insert2", 21=  Student( "insert3", 22=  Student( "insert4", 22="test_flx", "getAllStudents after insert: id = " + st.getId() + "; name = " + st.getName() + "; age = "+0].setName( "update1"0].setAge( 111=  Student("update2", 22220="test_flx", "getAllStudents after update: id = " + st.getId() + "; name = " + st.getName() + "; age = "+0"test_flx", "getAllStudents after dele: id = " + st.getId() + "; name = " + st.getName() + "; age = "+
@Before->@Test->@After。测试中,创建了叫studentDB的数据库,具体操作在StudentsTest方法中注释中详细说明了,下面看下结果。
log打印的结果如下,是符合上述操作的:
1 2 3 4 5 6 7 8 9 10 11 | 2019-07-16 10:35:12.486 32711-32730/com.flx.testroom D/test_flx: getAllStudents after insert: id = 1; name = insert1; age = 202019-07-16 10:35:12.486 32711-32730/com.flx.testroom D/test_flx: getAllStudents after insert: id = 2; name = insert2; age = 212019-07-16 10:35:12.486 32711-32730/com.flx.testroom D/test_flx: getAllStudents after insert: id = 3; name = insert3; age = 222019-07-16 10:35:12.487 32711-32730/com.flx.testroom D/test_flx: getAllStudents after insert: id = 4; name = insert4; age = 222019-07-16 10:35:12.502 32711-32730/com.flx.testroom D/test_flx: getAllStudents after update: id = 1; name = update1; age = 1112019-07-16 10:35:12.502 32711-32730/com.flx.testroom D/test_flx: getAllStudents after update: id = 2; name = update2; age = 2222019-07-16 10:35:12.502 32711-32730/com.flx.testroom D/test_flx: getAllStudents after update: id = 3; name = insert3; age = 222019-07-16 10:35:12.502 32711-32730/com.flx.testroom D/test_flx: getAllStudents after update: id = 4; name = insert4; age = 222019-07-16 10:35:12.516 32711-32730/com.flx.testroom D/test_flx: getAllStudents after dele: id = 2; name = update2; age = 2222019-07-16 10:35:12.517 32711-32730/com.flx.testroom D/test_flx: getAllStudents after dele: id = 3; name = insert3; age = 222019-07-16 10:35:12.517 32711-32730/com.flx.testroom D/test_flx: getAllStudents after dele: id = 4; name = insert4; age = 22 |
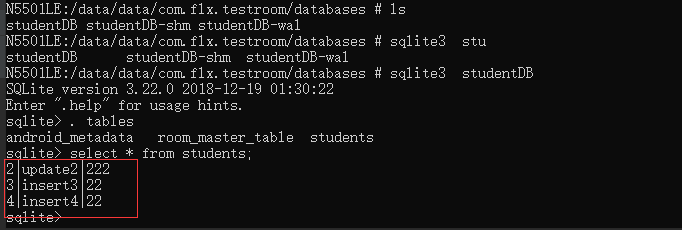
通过adb进入设备,读取数据库数据如下,也是符合的:

通过上面的例子,应该有一点了解或感觉,下面具体说一些Room相关的知识点。
1. 创建Room数据库 Database:
创建Room数据库有两种方式,在上面代码中测试里 就有选择了其中一种,持久化的数据库。
(1)databaseBuilder (Context context, Class<T> klass, String name)
创建的是持久化的数据库,上面例子就用的这种,生成的数据库在/data/data/<packagesname>/databases下。
1 | studentDb = Room.databaseBuilder(context, StudentDataBase.class, "studentDB").build(); |
(2)inMemoryDatabaseBuilder (Context context, Class<T> klass)
内存数据库,当进程结束后 数据库也相应的被释放,数据库中的信息也丢失了。
1 | studentDb = Room.inMemoryDatabaseBuilder( context, StudentDataBase.class ).build(); |
2. 实体 Entity:
上述例子中,Student即是实体,可以看代码中注释,有部分说明。下面具体说明下。
实体对应数据库中的表,包含了表的各个字段对应成的字段,以及操作方法(如例子中的每个字段的getter和setter方法)。
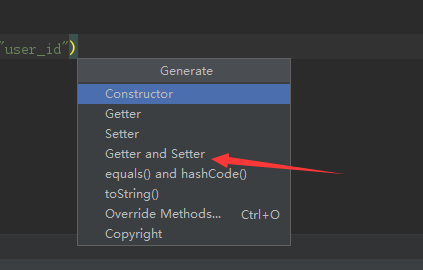
注:Android Studio快速生成getter setter方法,可使用Alt+Insert调出如下界面快速构造

使用实体,首先保证下面的结构组件已添加到build.gradle(Project:)中(这里添加的build.gradle和上面room依赖添加的不是一个文件,注意build.gradle后面的注释),默认是添加了的。
1 2 3 4 5 6 7 | allprojects { repositories { google() jcenter() }} |
@Entity 注释,定义了一个实体。可以包含多个参数,如下tableName-表名
1 2 | @Entity(tableName = "students")public class Student {<br>} |
主键使用注释@PrimaryKey定义,可以是单个字段,也可以是多个字段。如果是多个字段 在@Entity中添加,主键要可以设置自增属性autoGenerate。如:
1 2 | //多个字段的主键@Entity(primaryKeys = {"AA", "BB"})<br>public class Student {<br><br>}<br><br> |
1 2 | //主键自增@PrimaryKey(autoGenerate = true)<br>pulic int id; |
@ColumnInfo注释,定义一个变量对应的表中的字段,name属性即表中字段名。没有添加的,变量名即表中字段名。
1 2 | @ColumnInfo(name="student_name")public String name; |
默认实体中每个变量都会在表中新建一列与之对应,如果不想持久化某一个,可以使用变量的注释@Ignore 或 实体的注释@Entity(ignoredColumns = "xxxx")进行忽略。
FTS(full-text search):全文搜索支持,使用条件是Room版本在2.1.0及以上。通过注释@Fts3 or @Fts4 定义使用。
注意:1.一般使用@Fts4, 如果应用有严格的磁盘要求 或者 要兼容旧版本的SQLite才使用@Fts3。
2.主键必须是 INTEGER类型 名字是rowid.否则会有如下错误:
1 | 错误: The single primary key field in an FTS entity must either be named 'rowid' or must be annotated with @ColumnInfo(name = "rowid") |
简单例子:
@Fts4@Entity(tableName = "students")public class Student {    @PrimaryKey    public int rowid;

    @ColumnInfo(name="student_name")    public String name;
}
索引:通过索引加快查询,通过unique属性定义唯一性。如下(包含了两项的索引,并设置了唯一):
@Entity(tableName = "students",indices = {@Index(value = {"id", "student_name"},        unique = true)})public class Student {

    @PrimaryKey    public int id;

    @ColumnInfo(name="student_name")    public String name;
}
注意:索引不能在Fts中使用
1 | 错误: Indices not allowed in FTS Entity. |
实体类对象间的关系
Room禁止实体类之间的对象引用。
大致原因是性能和体验上的考虑:将关系从数据库映射到对象上,这种方式再客户端上存在性能问题。延迟加载(默认方式)是不可行的,它一般发生在UI线程上,UI线程查询磁盘数据有严重性能问题。Ui线程计算 绘制Activity或布局大致要16ms, 即使查询只要5ms 也可能导致没有足够时间,导致视觉上的问题。如果有事务并行或磁盘密集型操作,查询时间会更久。如果不使用延迟加载,程序获取的数据比需要的更多,造成内存消耗过多的问题,影响性能。
例如:有两个对象,Book和Author,每个Book都有一个Author对象。一个UI加载Book列表,可以通过延迟加载 获取图书检索作者的实例。第一次从数据库中查询author。一段时间后,可能UI上 还需显示作者的名字,通过下面代码添加:
1 | authorNameTextView.setText(book.getAuthor().getName()); |
这个看起来没有问题。如果提前查询作者信息,而如果不再需要数据,就很难更改数据的加载方式。例如,如果您的应用程序的UI不再需要显示作者信息,应用会继续加载不再显示的数据,从而浪费宝贵的内存空间。如果Author类引用其他表(如Books),则应用程序的效率会进一步降低。
(1). 一对多
下面是另一个名为Book的实体,通过注释@ForeignKey定义了它与Student的关系。
@Entity(foreignKeys = @ForeignKey(entity = Student.class,
        parentColumns = "id",
        childColumns = "student_id",
        onDelete = ForeignKey.CASCADE))//onDelete = ForeignKey.CASCADE,当Student被删除,则所有与之关联的Book都会被删除。public class Book {
    @PrimaryKey    public int bookId;    public String title;

    @ColumnInfo(name = "student_id")    public int studentId;
}
这里的一对多,是Student对Book。通过外键student_id使多个Book实例 关联到 Student实例上。
(2). 嵌套对象
如下在Student中嵌套了一个Address对象,这样Student实体对象就对应包含了这些列:id, student_name, street, state, city, post_code。
public class Address {    public String street;    public String state;    public String city;

    @ColumnInfo(name = "post_code")    public int postCode;
}


@Entity(tableName = "students",indices = {@Index(value = {"id", "student_name"},
        unique = true)})public class Student {

    @PrimaryKey    public int id;

    @ColumnInfo(name="student_name")    public String name;    @Embedded public Address address;
}
(3). 多对多
多对多,通过下面例子(官网)来具体看看。下面包含了两个实体,Playlist 和Song,以及一个中间类 PlaylistSongJoin 保存每个播放列表中的歌曲信息。
@Entitypublic class Playlist {
    @PrimaryKey public int id;    public String name;    public String description;
}

@Entitypublic class Song {
    @PrimaryKey public int id;    public String songName;    public String artistName;
}
PlaylistSongJoin:
@Entity(tableName = "playlist_song_join",
        primaryKeys = { "playlistId", "songId" },
        foreignKeys = {
                @ForeignKey(entity = Playlist.class,
                            parentColumns = "id",
                            childColumns = "playlistId"),
                @ForeignKey(entity = Song.class,
                            parentColumns = "id",
                            childColumns = "songId")
                })public class PlaylistSongJoin {    public int playlistId;    public int songId;
}
3. 数据库视图
2.1.0及更高版本才支持,和实体Entity类似,可以对视图执行SELECT,但不能执行INSERT, UPDATE, DELETE。
创建视图:使用注释@DatabaseView,注释的值设置成查询。
@DatabaseView("SELECT user.id, user.name, user.departmentId," +
              "department.name AS departmentName FROM user " +
              "INNER JOIN department ON user.departmentId = department.id")public class UserDetail {    public long id;    public String name;    public long departmentId;    public String departmentName;
}
关联视图到数据库:
@Database(entities = {User.class}, views = {UserDetail.class},
          version = 1)public abstract class AppDatabase extends RoomDatabase {    public abstract UserDao userDao();
}
4. DAO 访问数据库
要使用Room持久化库,需要通过数据访问对象DAO(data access objects)。 它可以是一个接口,也可以是一个抽象类。
Room不支持在主线程访问数据库(在构造数据库时若调用 allowMainThreadQueries() 可绕过),因为它可能比较长时间锁定UI(主线程) 导致ANR。若要在主线程访问数据库,需要使用异步方法 或者 手动将调用移到后台线程。
最开始的例子 中的StudentsDao就是这样的类。再次给出 :
@Daopublic interface StudentsDao {    @Insert    public void insertStudent(Student student);

    @Insert    public void insertStudents(Student student1, Student student2);

    @Insert    public void insertStudentsAndMore(Student student, List<Student> classmate);    @Update    public void updateStudents(Student ... students);    @Delete    public void deleStudents(Student ... students);    @Query( "SELECT * FROM students" )    public Student[] getAllStudents();

    @Query( "SELECT * FROM students WHERE student_name LIKE:studentName" )    public Student[] getStudentsByName(String studentName);

    @Query("SELECT student_name, age FROM students")    public List<Student> getNameAndAge();
}
增删改查 通过注释@Insert @Delete @Update @Query使用即可,Room已生成对应的实现。其中@Update @Delete是通过主键找到对应实体再进行操作。@Query使用SQL语句,返回对应的集合。
上面列了几种插入和查询的情况。
在上面介绍 实体对象间关系 中的 多对多 时,举的例子 两个实体,Playlist 和Song,以及一个中间类 PlaylistSongJoin ,下面是通过song查询playlist 和 通过playlist查询songs的代码,可以了解下:
@Daopublic interface PlaylistSongJoinDao {
    @Insert    void insert(PlaylistSongJoin playlistSongJoin);

    @Query("SELECT * FROM playlist " +
           "INNER JOIN playlist_song_join " +
           "ON playlist.id=playlist_song_join.playlistId " +
           "WHERE playlist_song_join.songId=:songId")
    List<Playlist> getPlaylistsForSong(final int songId);

    @Query("SELECT * FROM song " +
           "INNER JOIN playlist_song_join " +
           "ON song.id=playlist_song_join.songId " +
           "WHERE playlist_song_join.playlistId=:playlistId")
    List<Song> getSongsForPlaylist(final int playlistId);
}
5. Room数据库 迁移
当应用添加或改变某些东西,需要修改实体Entity时,对应的数据库结构也会改变。这时需要保存已有的数据,进行数据库迁移。
数据库迁移,通过实现Migration这个迁移类,这个类构造指明了startVersion和endVersion(数据库类的@Database中添加的version值), 实现了migrate方法。如下:
static final Migration MIGRATION_1_2 = new Migration(1, 2) {
    @Override    public void migrate(SupportSQLiteDatabase database) {
        database.execSQL("CREATE TABLE `Fruit` (`id` INTEGER, "
                + "`name` TEXT, PRIMARY KEY(`id`))");
    }
};static final Migration MIGRATION_2_3 = new Migration(2, 3) {
    @Override    public void migrate(SupportSQLiteDatabase database) {
        database.execSQL("ALTER TABLE Book "
                + " ADD COLUMN pub_year INTEGER");
    }
};

Room.databaseBuilder(getApplicationContext(), MyDb.class, "database-name")
        .addMigrations(MIGRATION_1_2, MIGRATION_2_3).build();
