参考地址 组件化(三)静态库和动态库
引子
库,是我们在开发中的重要角色,库的作用在于代码共享、模块分割以及提升良好的工程管理实践。
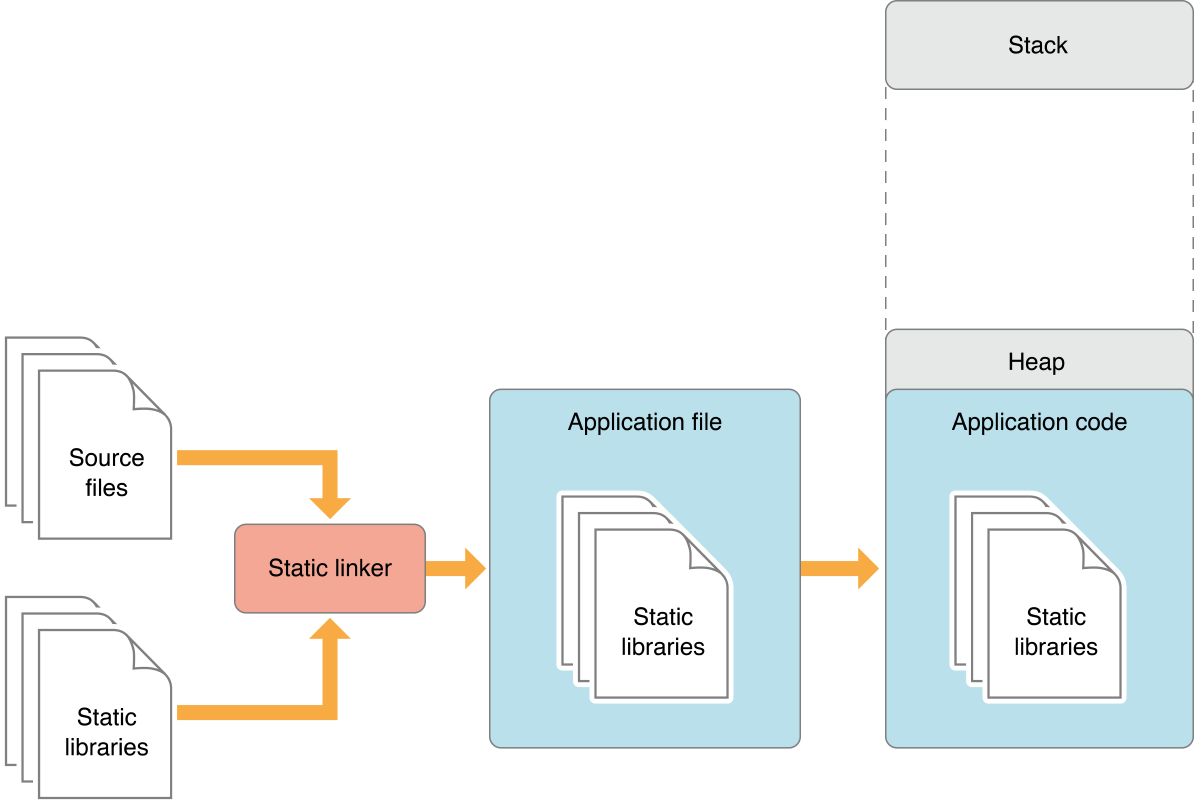
其中库又分为静态库和动态库,静态库链接时完整地拷贝至可执行文件中,被多次使用就有多份冗余拷贝。
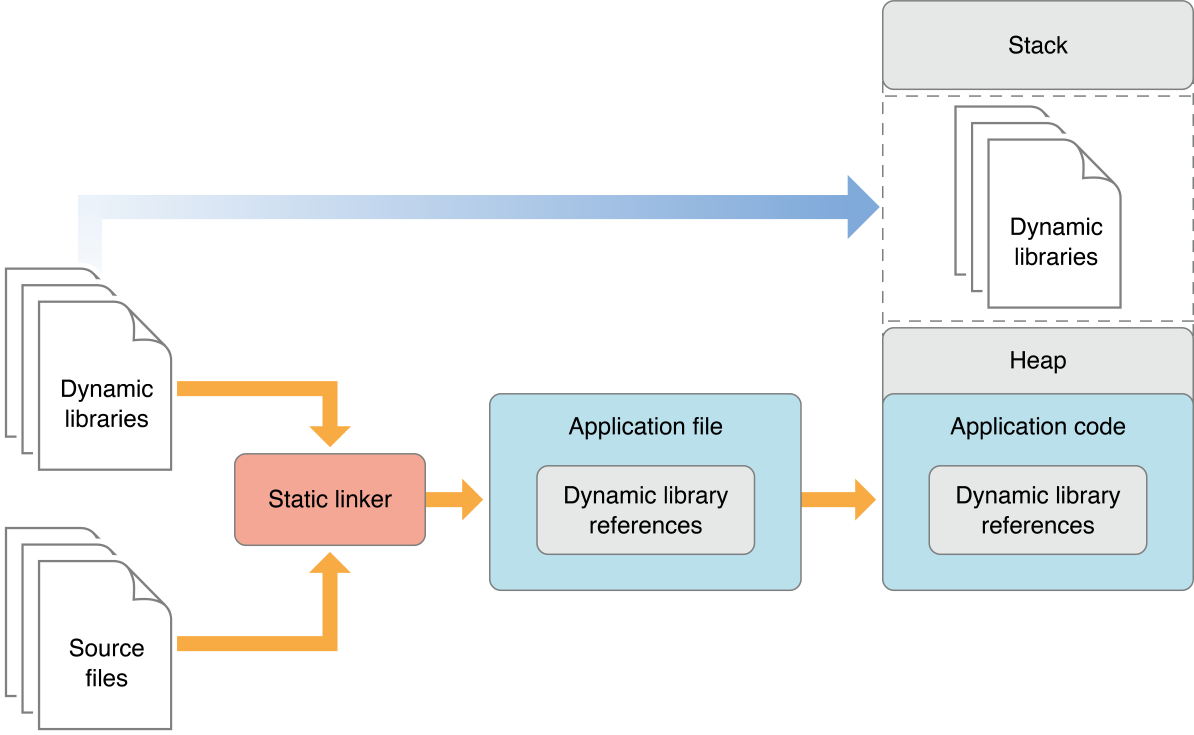
动态库链接时不复制,程序运行时由系统动态加载到内存,供程序调用,系统只加载一次,多个程序共用,节省内存。
Framework 是 Cocoa/Cocoa Touch 程序中使用的一种资源打包方式,可以将代码文件、头文件、资源文件(nib/xib、图片、国际化文本)、说明文档等集中在一起,方便开发者使用。Framework 其实是资源打包的方式,和静态库动态库的本质是没有什么关系。
在 iOS 8 之前,iOS 平台不支持使用动态 Framework,开发者可以使用的 Framework 只有苹果系统提供的 UIKit.Framework,Foundation.Framework 等。开发者要进行模块化,只能是打包成静态库 .a 文件,同时附上头文件。但是这种方式打包不够方便,使用时也比较麻烦,没有 Framework 的便捷性。但是这时候的 Framework 只支持打包成静态库的 Framework。
iOS 8/Xcode 6 推出之后,添加了动态库的支持,Xcode 6 支持动态 Framework 动态 Framework 和系统的 UIKit.Framework 还是有很大区别。系统的 Framework 不需要拷贝到目标程序中,是一个链接,而开发者打包的 Framework,还是要拷贝到 App 中,因此苹果又把这种 Framework 称为 Embedded Framework(可植入性 Framework)。
静态库与动态库的区别?
| 静态库 | 动态库 | |
|---|---|---|
| 定义 | 链接时完整地拷贝至可执行文件中,被多次使用就有多份冗余拷贝。 | 链接时不复制,程序运行时由系统动态加载到内存,供程序调用,系统只加载一次,多个程序共用,节省内存。 |
| 形式 | .a、.framework | .dylib、.tbd 和.framework |
| 场景 | 避免少量改动经常导致大量的重复编译连接 | 使用动态库,可缩小最终可执行文件体积 使用动态库,多个应用程序共享内存中得同一份库文件,节省资源 使用动态库,可以不重新编译连接可执行程序的前提下,更新动态库文件达到更新应用程序的目的 |
.a 与.framework 有什么区别?
| .a | .framework | |
|---|---|---|
| 文件 | 是一个纯二进制文件 | 除了有二进制文件之外还有资源文件 |
| 使用 | 文件不能直接使用,至少要有.h 文件配合 | 文件可以直接使用 |
两者关系是:
.a + .h + sourceFile = .framework。
更多建议
注意理解:无论是.a 静态库还.framework 静态库,我们需要的都是 “二进制文件 +.h + 其它资源文件” 的形式,不同的是,.a 本身就是二进制文件,需要我们自己配上
.h和其它文件才能使用,而.framework 本身已经包含了.h 和其它文件,可以直接使用。图片资源的处理:两种静态库,一般都是把图片文件单独的放在一个.bundle 文件中,一般.bundle 的名字和.a 或.framework 的名字相同。.bundle 文件很好弄,新建一个文件夹,把它改名为.bundle 就可以了,右键,显示包内容可以向其中添加图片资源。
如果一个静态库很复杂,需要暴露的.h 比较多的话,就可以在静态库的内部创建一个.h 文件(一般这个.h 文件的名字和静态库的名字相同),然后把所有需要暴露出来的.h 文件都集中放在这个.h 文件中,而那些原本需要暴露的.h 都不需要再暴露了,只需要把.h 暴露出来就可以了。
静态库
制作静态库.a
一、简单静态库
简单静态库指的是,不包含其他静态库的静态库,常用于封装一些基础的工具类。
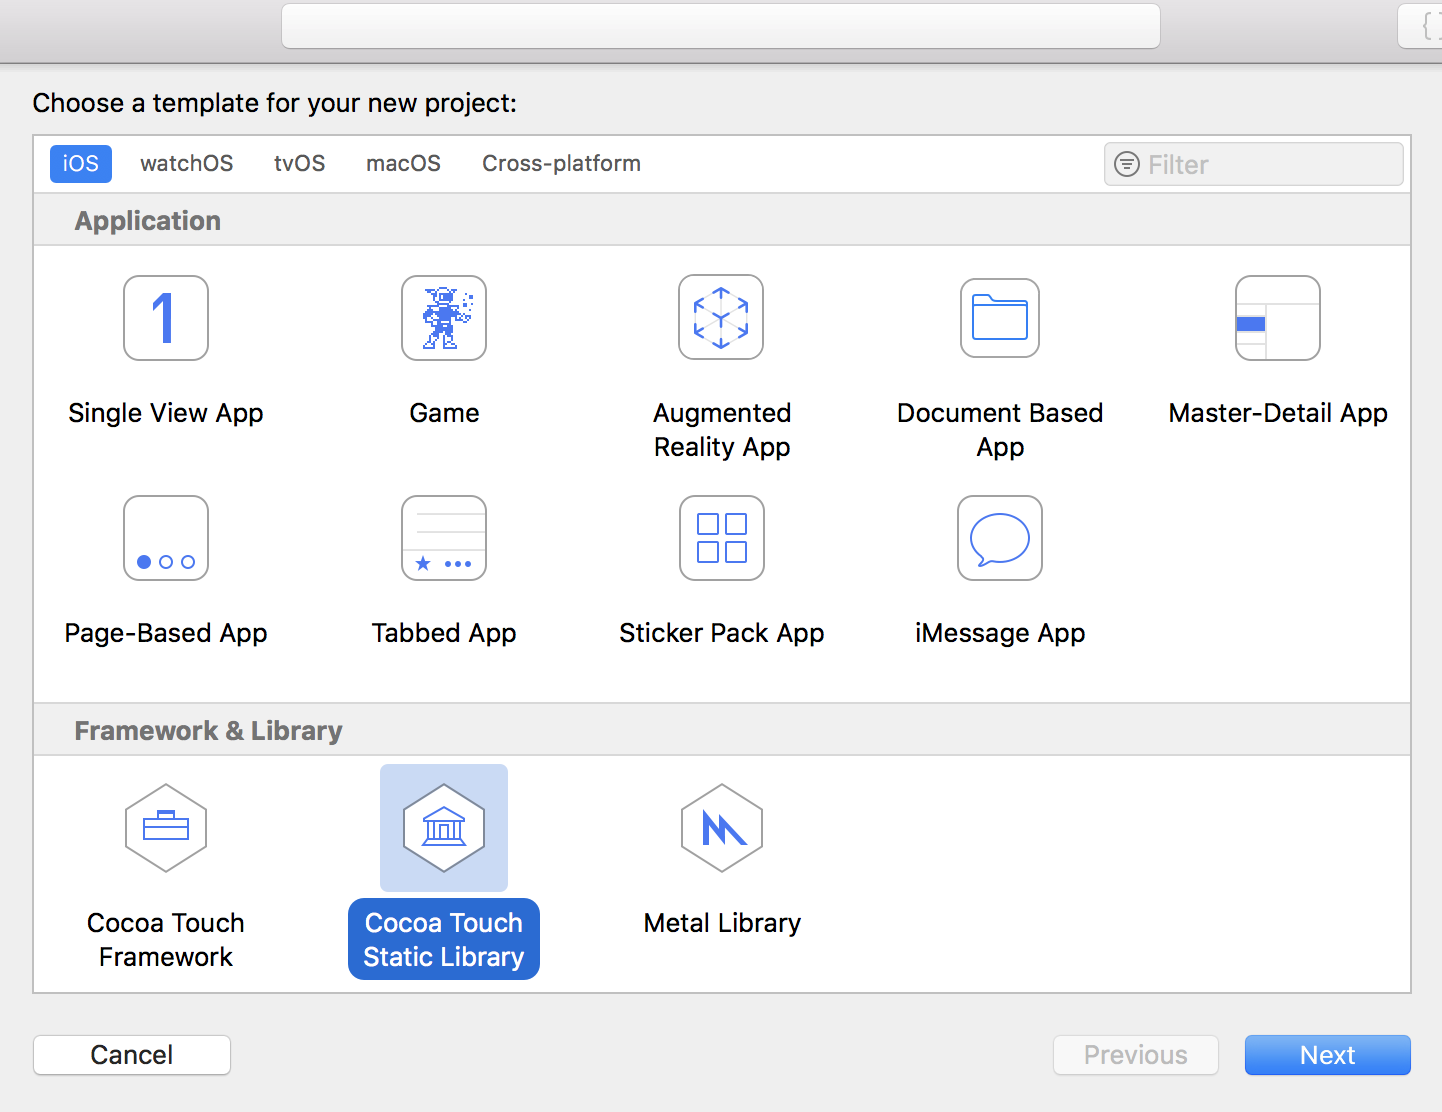
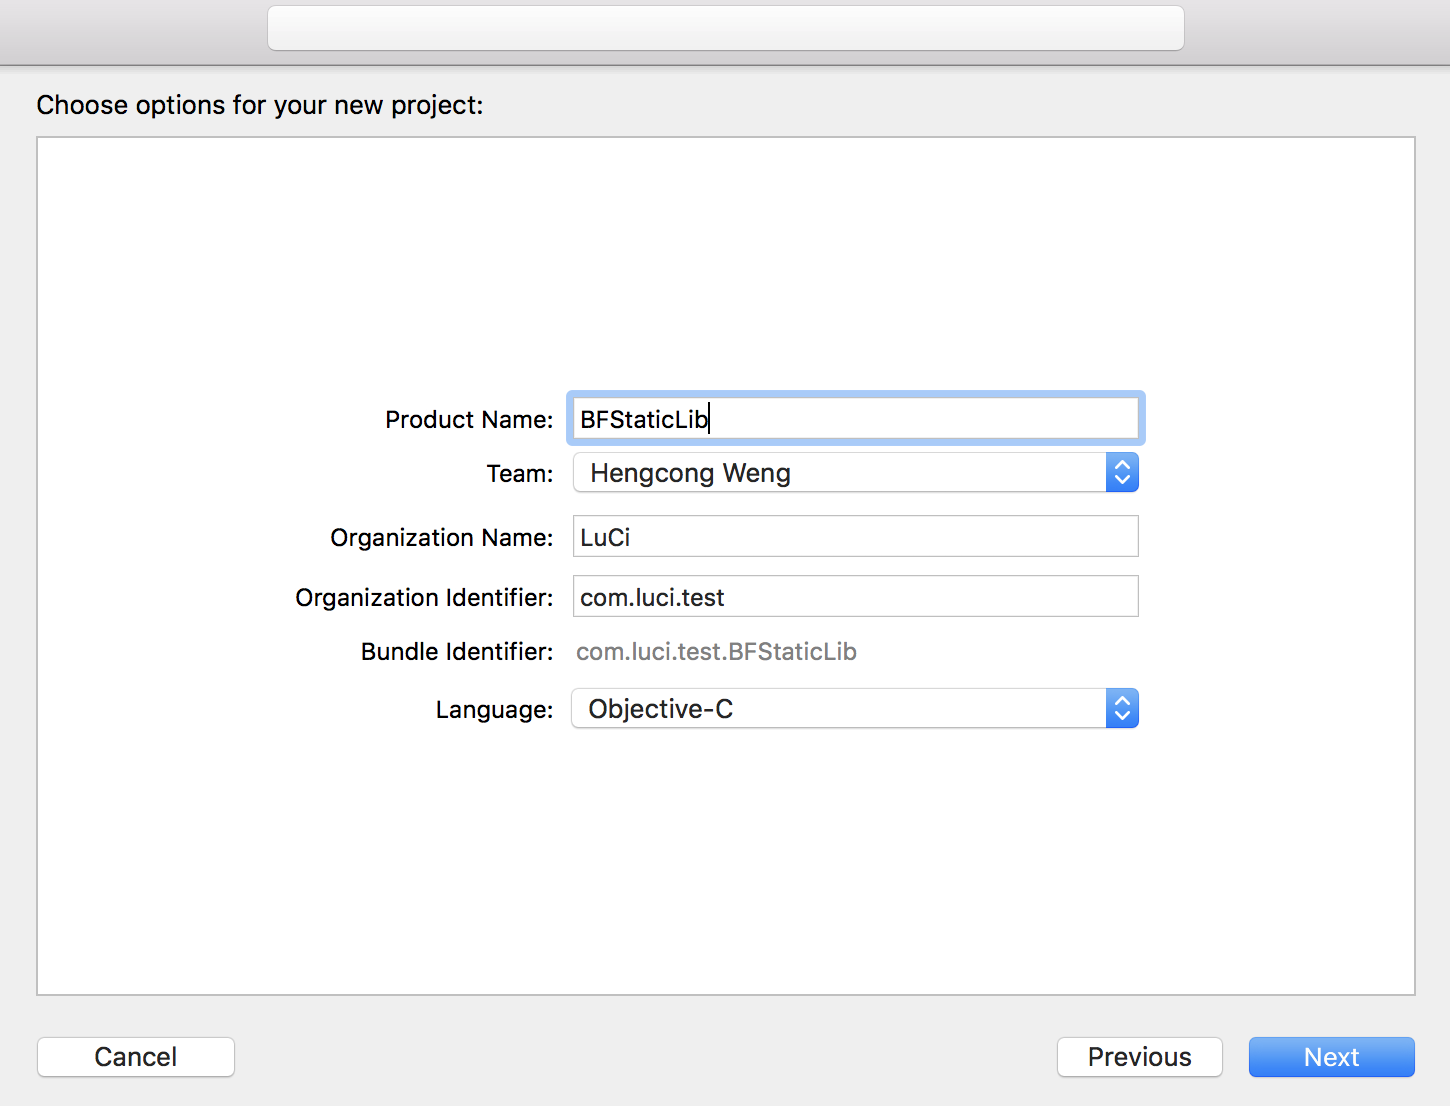
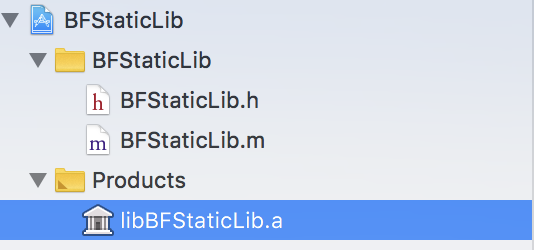
1. 创建静态库工程
然后直接编译,可以得到.a 为后缀的静态库。
2. 编译静态库
设置 Edit Scheme->Build Configuration-> 选为 Release。
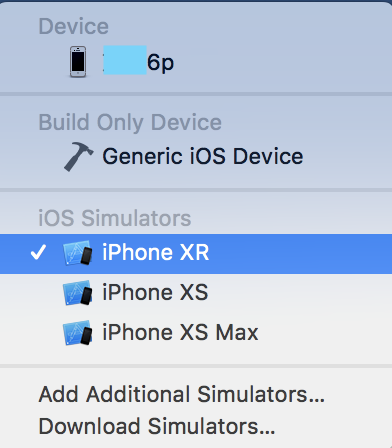
完成代码编写,并选中 Device 为 “**6p” 是真机编译,还是模拟器编译,不同的 Device 下编译出的静态库是不同的,真机编译可能在模拟器中使用会 crash,同样模拟器编译出来在真机运行中会发生问题。
所以,需要在真机及模拟器下各自编译,导出编译后的库。
导出后,可以查看对应的库信息:
1
2
3
4
5
6
7
8
$ lipo -info libBFStaticLib_device.a
input file libBFStaticLib_device.a is not a fat file
Non-fat file: libBFStaticLib_device.a is architecture: arm64
$ lipo -info libBFStaticLib_simulator.a
input file libBFStaticLib_simulator.a is not a fat file
Non-fat file: libBFStaticLib_simulator.a is architecture: x86_64
3. 合并静态库
上一步生成的不同指令集下的静态库,需要合并才能支持多设备,如下:
1
2
3
4
5
//lipo -create ***.a ***.a -output output_lib_path
$ lipo -create libBFStaticLib_simulator.a libBFStaticLib_device.a -output ./libBFStaticLib
$ lipo -info libBFStaticLib
Architectures in the fat file: libBFStaticLib are: x86_64 arm64
关于指令集,可以参考本文四、避免入坑 —— 设备指令集。
另外,Stackoverflow 提供了一种脚本编译通用静态库。
4. 相关设置
a. 添加 static library 的头文件
在 Targets->build settings->user header search paths 设置 static library 的头文件搜索路径
其中要用到的一些 Xcode 预定义变量,参考 http://developer.apple.com/library/ios/ - documentation/DeveloperTools/Reference/XcodeBuildSettingRef/1-Build_Setting_Reference/build_setting_ref.html
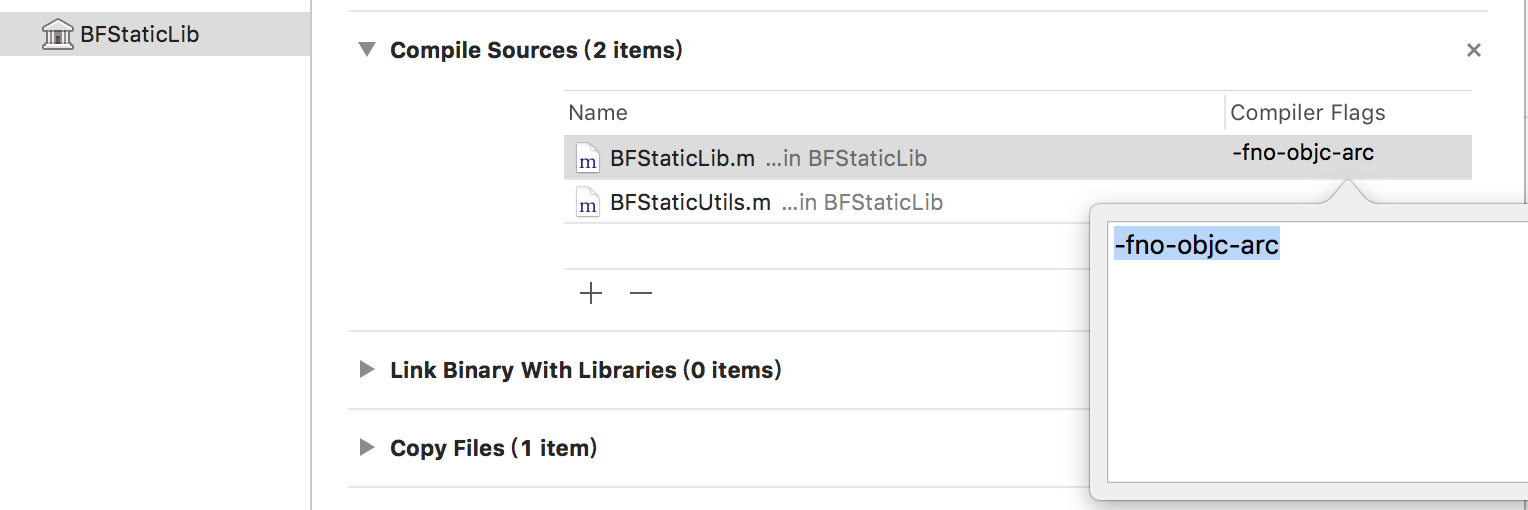
b. arc/mrc
可设置对应的文件是否开启 ARC:-fobjc-arc/-fno-objc-arc。
二、复杂静态库
是指静态库中包含其他库中的功能,比如你要封装一个库中要用到网络库 AFNetworking,采用 Cocoapods。
当然如果不使用 Cocoapods,在依赖其他库时,需要将其头文件导入到静态库工程,而且在 Compile Source 不要添加进编译。来源于此。
三、使用封装好的静态库
编译完成后,找 “#include” 文件夹下面的头文件和及静态库
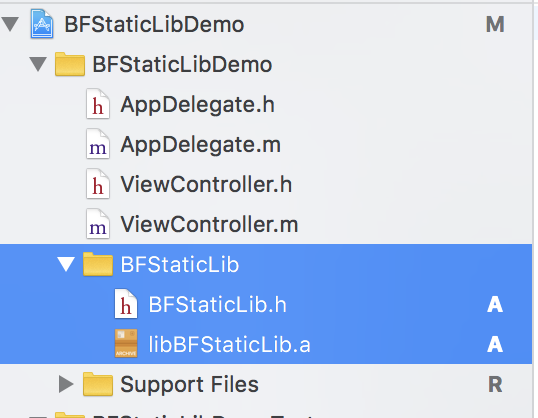
需要的是,BFStaticLib.h,以及之前合并好的 libBFStaticLib.a 库。
将以上,拖入使用的项目中。
制作静态库 framework
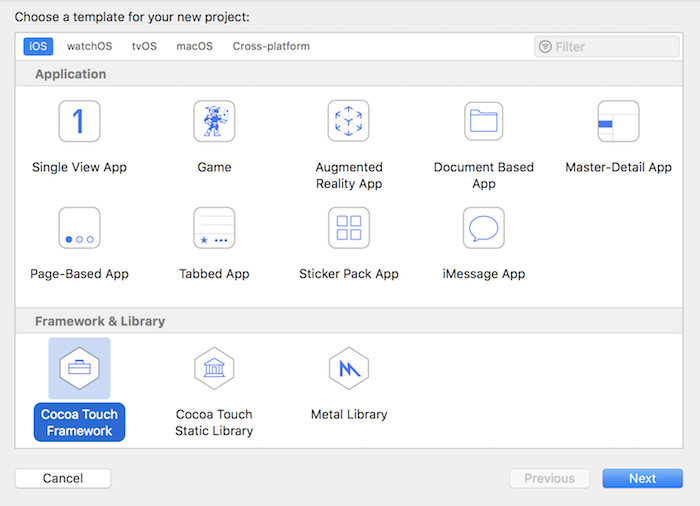
一、创建工程及工程设置
创建一个项目名称为:BFStaticFramework 的静态库。
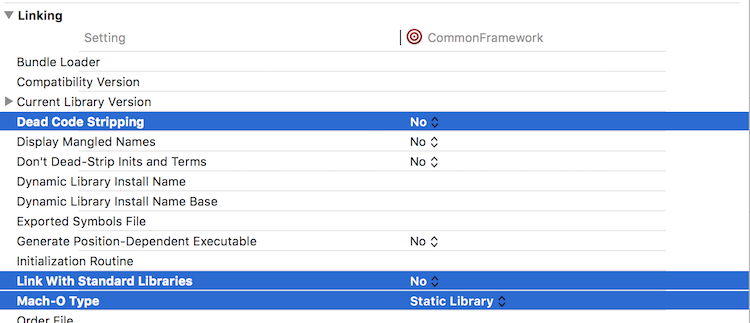
其工程设置中,如下
在 Linking 里,将 Dead Code Stripping 设置为 NO,用于删除对象文件中不需要加载的符号,减小二进制文件大小
Link With Standard Libraries 设置为 NO,链接使用标准静态库。
将 Mach-O Type 改为 Static Librariy,选择 Mach-O 的类型。
二、添加头文件
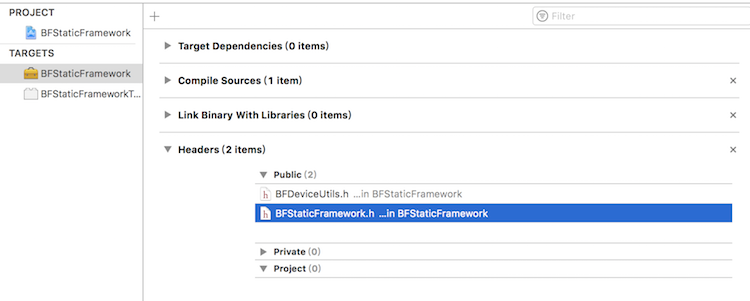
将需要暴露的头文件放在 Build Phases 对应的分组下:
Public:对外暴露的头文件。
Private:查看 Framework 下的头文件,依然是暴露出来的。
Project:该分组头文件对工程来说才是 “私有” 的
所以,将你的头文件或者在 Public 下,或者在 Project 下。尽可能少的暴露头文件,将其他类放在 Project 中。
如果一个静态库很复杂,需要暴露的.h 比较多的话,就可以在静态库的内部创建一个.h 文件(一般这个.h 文件的名字和静态库的名字相同),然后把所有需要暴露出来的.h 文件都集中放在这个.h 文件中,而那些原本需要暴露的.h 都不需要再暴露了,只需要把.h 暴露出来就可以了。
三、导出 Framework
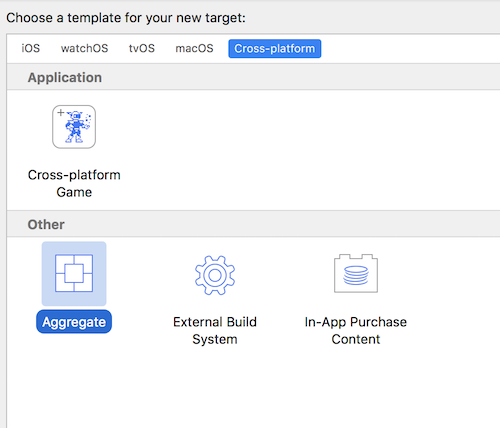
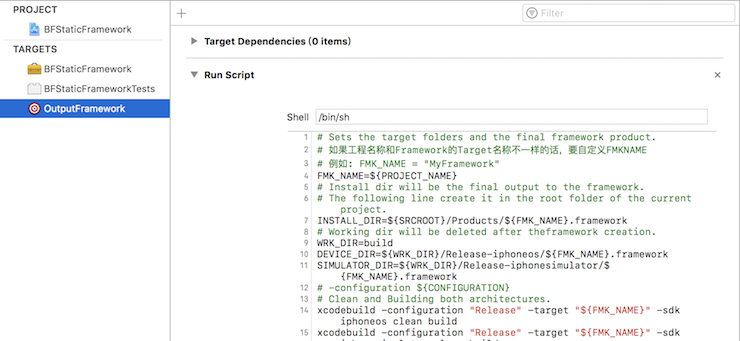
在这里,我们创建一个 Aggregate。
添加一个脚本:
为 OutputFramework 添加一个脚本
1
2
3
4
5
6
7
8
9
10
11
12
13
14
15
16
17
18
19
20
21
22
23
24
25
26
27
# Sets the target folders and the final framework product.
# 如果工程名称和Framework的Target名称不一样的话,要自定义FMKNAME
# 例如: FMK_NAME = "MyFramework"
FMK_NAME=${PROJECT_NAME}
# Install dir will be the final output to the framework.
# The following line create it in the root folder of the current project.
INSTALL_DIR=${SRCROOT}/Products/${FMK_NAME}.framework
# Working dir will be deleted after theframework creation.
WRK_DIR=build
DEVICE_DIR=${WRK_DIR}/Release-iphoneos/${FMK_NAME}.framework
SIMULATOR_DIR=${WRK_DIR}/Release-iphonesimulator/${FMK_NAME}.framework
# -configuration ${CONFIGURATION}
# Clean and Building both architectures.
# 在Xcode 10时,去掉下面每一句末尾的clean build,因为会每次都清空build文件夹,导致最后到处的framework为空
xcodebuild -configuration "Release" -target "${FMK_NAME}" -sdk iphoneos
xcodebuild -configuration "Release" -target "${FMK_NAME}" -sdk iphonesimulator
# Cleaning the oldest.
if [ -d "${INSTALL_DIR}" ]
then
rm -rf "${INSTALL_DIR}"
fi
mkdir -p "${INSTALL_DIR}"
cp -R "${DEVICE_DIR}/" "${INSTALL_DIR}/"
# Uses the Lipo Tool to merge both binary files (i386 + armv6/armv7) into one Universal final product.
lipo -create "${DEVICE_DIR}/${FMK_NAME}" "${SIMULATOR_DIR}/${FMK_NAME}" -output "${INSTALL_DIR}/${FMK_NAME}"
rm -r "${WRK_DIR}"
open "${INSTALL_DIR}"
运行脚本,输出 Framework,记住,一定要选中真机,否则生成的架构只支持 x86_64 arm64 。
四、验证
1
2
3
$ cd framework路径
$ lipo -info BFStaticFramework
Architectures in the fat file: BFStaticFramework are: armv7 i386 x86_64 arm64
使用,直接拖入工程代码即可,。
动态库
一、制作
制作动态库大体流程和制作静态库 framework 一致,只需要在第一步中工程配置中,将 Mach-O Type 改为 Dynamic Librariy。
二、使用
将动态库拖入工程中,直接运行,会出现下面错误
dyld: Library not loaded: @rpath/BFDynamicFramework.framework/BFDynamicFramework
Referenced from: /Users/wenghengcong/Library/Developer/CoreSimulator/Devices/
注意这一点与静态库有所不同!
如何解决?
方案一:需要将该库,添加到
Embedde Binaries中。
方案二:尝试将动态库的 Status 的状态修改为 Optional,
改成 Optional 有效的前提是动态库中不包含分类,或者包含了分类但是未进行调用。否则,只能按方案一。
添加资源
我们继续使用 BFStaticFramework。
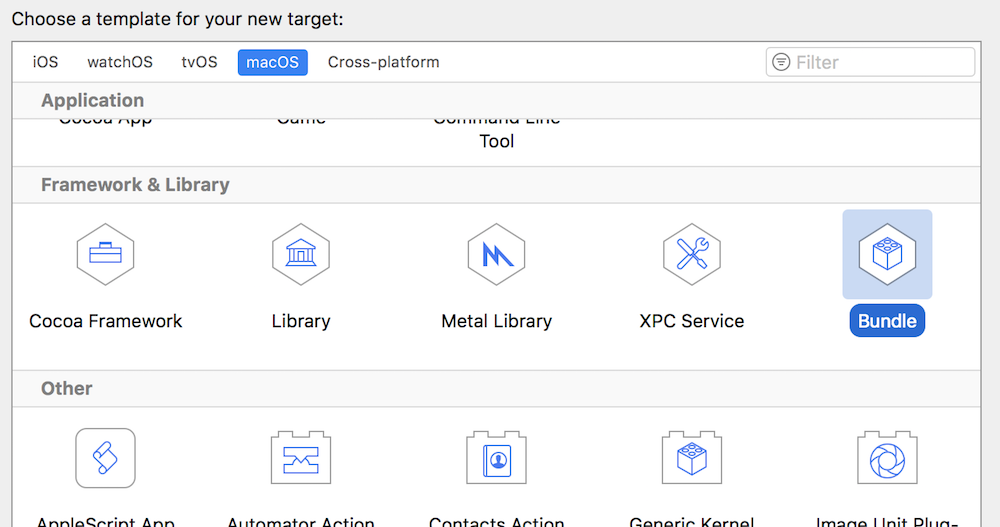
一、创建 Bundle Target
在当前工程中,新建一个 Target。
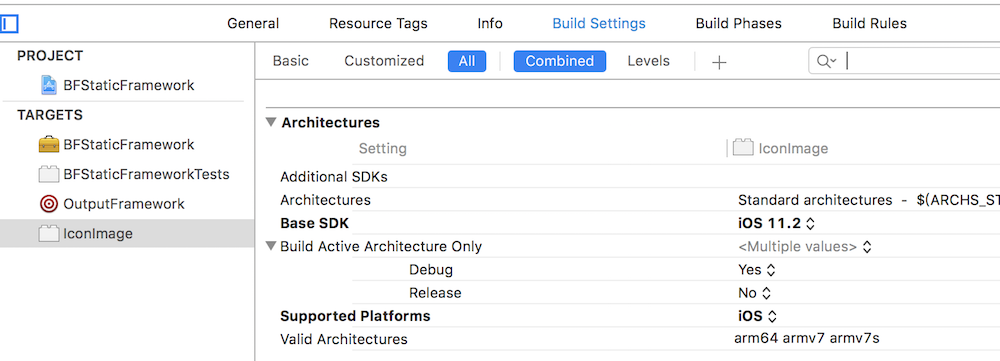
二、Build Settings 设置
选中对应的 Target:IconImage
下面点击 Build Settings,进行一些设置:
Base SDK: 选中,并按下 Delete,就会默认使用最新的 iOS SDK。
Supported Platforms:选中 iOS
Product Name:替换为
BFStaticFrameworkEnable Bitcode:设置为 NO。
如果不设置,可能会遇到错:
ld: -bundle and -bitcode_bundle (Xcode setting ENABLE_BITCODE=YES) cannot be used together
COMBINE_HIDPI_IMAGES:设置 NO
经测试在高版本的 XCode 中,设置为 YES 也不会导致,打包出的 framework 中的 png 图片格式变为 tiff。
所以一定要修改。
三、编译出包
直接出包
编译出包,得到 BFStaticFramework.bundle。
为了确保编译 BFStaticFramework.framework 时,也编译 BFStaticFramework.bundle,在之前输出 Framework 的 target 下,添加 target dependencies,如下:
并且,为了是的 bundle 文件和 Framework 在同一目录下。
在 OutputFramework 对应的脚本中添加:
1
2
3
4
5
6
.....
# Copy the resources bundle
ditto "${BUILT_PRODUCTS_DIR}/${FMK_NAME}.bundle" \
"${SRCROOT}/Products/${FMK_NAME}.bundle"
open "${INSTALL_DIR}"
如下:
导入 Framework
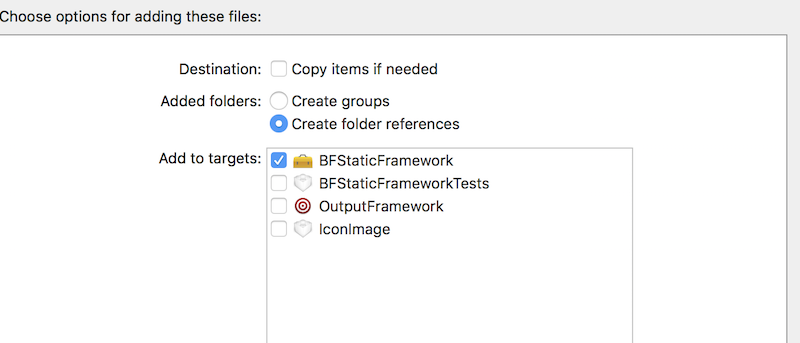
进一步,如果要将 bundle 文件打入 Framework 包中:
首先,将上一步中得到的 bundle 文件直接拖入 BFStaticFramework 工程中,并选中不要 Copy items if needed。
得到如下的结构:
四、使用
如果,需要将对应的 bundle 拖到对应的工程中去使用:
1
2
3
4
UIImage *image = [UIImage imageNamed:@"BFStaticFramework.bundle/qq"];
//or
UIImage *image = [UIImage imageNamed:@"qq" inBundle:[NSBundle bundleWithPath:[[NSBundle mainBundle] pathForResource:@"BFStaticFramework" ofType: @"bundle"]] compatibleWithTraitCollection:nil];
或者新建分类:
1
2
3
4
5
6
7
8
9
10
11
12
13
14
15
16
17
18
19
20
21
22
23
24
25
26
27
28
29
30
31
32
33
34
35
36
37
38
39
40
41
42
43
44
45
46
47
48
49
50
51
52
//.h
@interface UIImage (Resource)
+ (UIImage *)resourceImageNamed:(NSString *)name;
@end
/.m
@implementation UIImage (Resource)
+ (UIImage *)resourceImageNamed:(NSString *)name{
//先从默认目录里读
UIImage *imageFromMainBundle = [UIImage imageNamed:name];
if (imageFromMainBundle) {
return imageFromMainBundle;
}
//读不到再去Bundle里读
//此处Scale是判断图片是@2x还是@3x
NSInteger scale = (NSInteger)[[UIScreen mainScreen] scale];
for (NSInteger i = scale; i >= 1; i--) {
NSString *filepath = [self getImagePath:name scale:i];
UIImage *tempImage = [UIImage imageWithContentsOfFile:filepath];
if (tempImage) {
return tempImage;
}
}
return nil;
}
+ (NSString *)getImagePath:(NSString *)name scale:(NSInteger)scale{
NSURL *bundleUrl = [[NSBundle mainBundle] URLForResource:@"Resource" withExtension:@"bundle"];
NSBundle *customBundle = [NSBundle bundleWithURL:bundleUrl];
NSString *bundlePath = [customBundle bundlePath];
NSString *imgPath = [bundlePath stringByAppendingPathComponent:name];
NSString *pathExtension = [imgPath pathExtension];
//没有后缀加上PNG后缀
if (!pathExtension || pathExtension.length == 0) {
pathExtension = @"png";
}
//Scale是根据屏幕不同选择使用@2x还是@3x的图片
NSString *imageName = nil;
if (scale == 1) {
imageName = [NSString stringWithFormat:@"%@.%@", [[imgPath lastPathComponent] stringByDeletingPathExtension], pathExtension];
}
else {
imageName = [NSString stringWithFormat:@"%@@%ldx.%@", [[imgPath lastPathComponent] stringByDeletingPathExtension], (long)scale, pathExtension];
}
//返回删掉旧名称加上新名称的路径
return [[imgPath stringByDeletingLastPathComponent] stringByAppendingPathComponent:imageName];
}
@end
Framework
上面我们讲述了如何制作,使用动态库和静态库的 Framework,下面我们针对 Framework 本身进行一些探讨。
配置
| Key | Description |
|---|---|
CFBundleName | The framework display name |
CFBundleIdentifier | The framework identifier (as a Java-style package name) |
CFBundleVersion | The framework version |
CFBundleExecutable | The framework shared library |
CFBundleSignature | The framework signature |
CFBundlePackageType | The framework package type (which is always 'FMWK') |
NSHumanReadableCopyright | Copyright information for the framework |
CFBundleGetInfoString | A descriptive string for the Finder |
结构
下面以 Alamofire 作为参考,目录如下::
1
2
3
4
5
6
7
8
9
10
11
12
13
$ tree -a -L 3
.
├── Alamofire -> Versions/Current/Alamofire
├── Headers -> Versions/Current/Headers
├── Modules -> Versions/Current/Modules
├── Resources -> Versions/Current/Resources
└── Versions
├── A
│ ├── Alamofire
│ ├── Headers
│ ├── Modules
│ └── Resources
└── Current -> A
而我们上面制作的,以 BFDynamicFramework 为例,结构如下:
1
2
3
4
5
6
7
8
9
10
11
.
├── .DS_Store
└── BFDynamicFramework.framework
├── BFDynamicFramework
├── Headers
│ ├── BFDeviceUtils.h
│ ├── BFDynamicFramework.h
│ └── UIView+Frame.h
├── Info.plist
└── Modules
└── module.modulemap
如何将我们默认的工程结构,修改成 Alamofire 类似的结构呢?
下面调试中的两种方法都可以做到。
子工程调试: 手动写脚本,改变 Framework 结构。
进入 target,选中 BFStaticFramework->Build Phases->Add “New Run Script Phases”
1
2
3
4
5
6
7
8
9
10
11
12
13
14
15
set -e
export FRAMEWORK_LOCN="${BUILT_PRODUCTS_DIR}/${PRODUCT_NAME}.framework"
# Create the path to the real Headers die
mkdir -p "${FRAMEWORK_LOCN}/Versions/A/Headers"
# Create the required symlinks
/bin/ln -sfh A "${FRAMEWORK_LOCN}/Versions/Current"
/bin/ln -sfh Versions/Current/Headers "${FRAMEWORK_LOCN}/Headers"
/bin/ln -sfh "Versions/Current/${PRODUCT_NAME}" \
"${FRAMEWORK_LOCN}/${PRODUCT_NAME}"
# Copy the public headers into the framework
/bin/cp -a "${TARGET_BUILD_DIR}/${PUBLIC_HEADERS_FOLDER_PATH}/" \
"${FRAMEWORK_LOCN}/Versions/A/Headers"
之后,编译输出的结构就会更改:
1
2
3
4
5
6
7
8
9
10
11
12
13
$ tree -L 3
.
├── BFStaticFramework
├── Headers
│ ├── BFDeviceUtils.h
│ ├── BFStaticFramework.h
│ ├── Headers -> Versions/Current/Headers
│ └── UIView+Frame.h
├── Info.plist
└── Versions
├── A
│ └── Headers
└── Current -> A
Cocoapods:自动生成规范的目录结构。
调试
一、子工程调试
在前面,我们创建了 BFStaticFramework 静态库(也适用于动态库),现在我们创建一个调试工程 BFTestFramework。
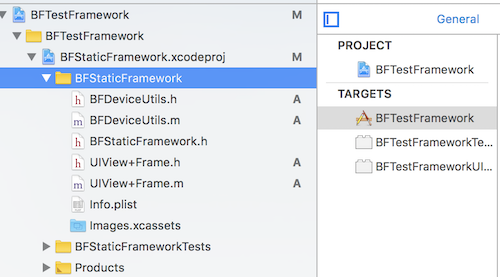
打开 BFTestFramework,将 BFStaticFramework.xcodeproj 拖入 BFTestFramework,注意,拖入是,一定要确保 Xcode 没有打开 BFStaticFramework.xcodeproj,因为同一个工程,不能再两个窗口中打开。如下图:
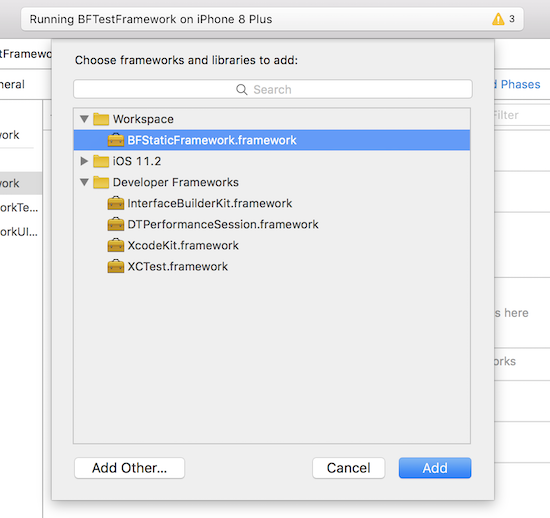
现在,要将 BFStaticFramework 静态库链接到 BFTestFramework,点击 TARGETS-BFTestFramework,Build Phases 下,展开 Link Binary With Libraries 面板,添加 BFTestFramework。
之后,BFStaticFramework 任何的修改,都会同步到测试 demo 中。
二、CocoaPods 工程调试
详细见下面。
推荐方案:CocoaPods 库开发流程
下面我们测试 BFDynamicFramework 来集成到 Cocoapods 中。
首先,我们要集成到 Cocoadpods,必须要将 BFDynamicFramework 发布,在这里,我们采用本地路径,无须发布到 Cocoapods,podspec 文件以及如何发布库在 iOS:模块化(二)Cocoapods - 创建私有库有详细说明。
创建库 Podspec 文件
进入到 BFDynamicFramework 路径,创建 Podspec 文件,该文件指定了库的基本信息:
1
2
$ cd BFDynamicFramework
$ pod spec create BFDynamicFramework
下面是具体的路径;
现在我们打开 BFDynamicFramework.podspec,编辑库信息:
1
2
3
4
5
6
7
8
9
10
11
12
13
14
15
16
17
Pod::Spec.new do |s|
s.name = "BFDynamicFramework"
s.version = "0.0.1"
s.summary = "build frameworks by cocoapods."
s.description = <<-DESC
show you how to build frameworks by cocoapods
DESC
s.homepage = "https://github.com/wenghengcong/BeeFunMac"
s.license = "MIT"
s.author = { "wenghengcong" => "wenghengcong@gamil.com" }
s.source = { :path => '.' }
# 注意代码路径
s.source_files = "Classes", "BFDynamicFramework/Classes/**/*.{h,m}"
# 注意资源路径
s.resources = "BFDynamicFramework/Assets/*.{png,jpg,xib,storyboard,xcassets}", "BFDynamicFramework/Assets/**/*.{png,jpg,xib,storyboard,xcassets}"
end
至此,本地库已经支持集成。
创建测试工程的 Podfile
进入测试的工程目录:
1
$ cd BFTestFramework
创建 Podfile 文件,该文件指明需要集成哪些库。
1
2
3
4
5
6
$ pod init
$ tree -a -L 1
.
├── BFTestFramework
├── BFTestFramework.xcodeproj
└── Podfile
这时候,目录下会有 PodFile 文件,打开编辑如下:
1
2
3
4
5
6
7
8
9
10
11
12
13
14
15
16
17
# Uncomment the next line to define a global platform for your project
platform :ios, '9.0'
target 'BFTestFramework' do
use_frameworks!
# 指明库podspec的路径,这里是BFDynamicFramework.podspec的路径,在此,BFDynamicFramework和BFTestFramework同级,所以path是../BFDynamicFramework
pod 'BFDynamicFramework', :path => '../BFDynamicFramework'
end
# Workaround for Cocoapods issue #7606
post_install do |installer|
installer.pods_project.build_configurations.each do |config|
config.build_settings.delete('CODE_SIGNING_ALLOWED')
config.build_settings.delete('CODE_SIGNING_REQUIRED')
end
end
安装集成
1
2
3
4
5
6
7
8
$ pod install
Analyzing dependencies
Fetching podspec for `BFDynamicFramework` from `../BFDynamicFramework`
Downloading dependencies
Installing BFDynamicFramework (0.0.1)
Generating Pods project
Integrating client project
........
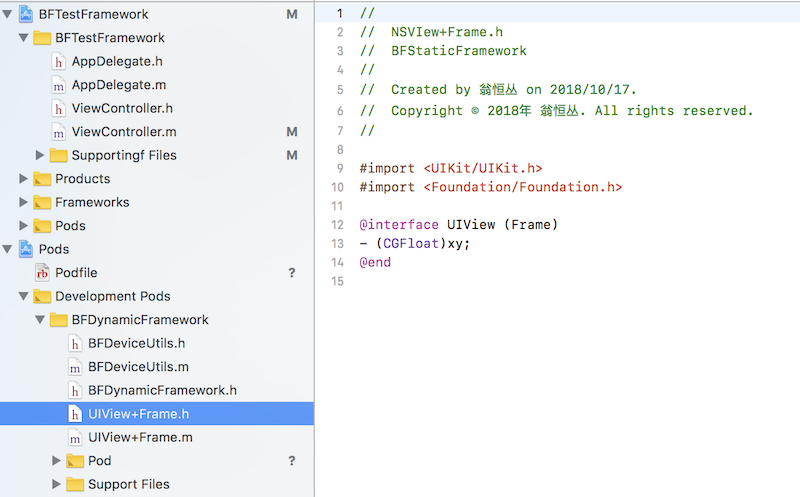
其集成之后的工程如下:
在 Deveopment Pods 下集成了我们需要的 BFDynamicFramework,之后,我们可以在测试工程中 BFTestFramework 直接修改库源码,并会同步到 BFDynamicFramework 库。
自动化
上面集成过程冗余,每次创建一个库,要测试还需要创建一个 Demo app 测试来,需要编辑两个文件:
Podspec:库信息文件
Podfile:Demo app 的引用文件
需要保证以上文件正确,然后才能正确发布、测试。
最糟心的是两个分开的工程,需要单独维护。
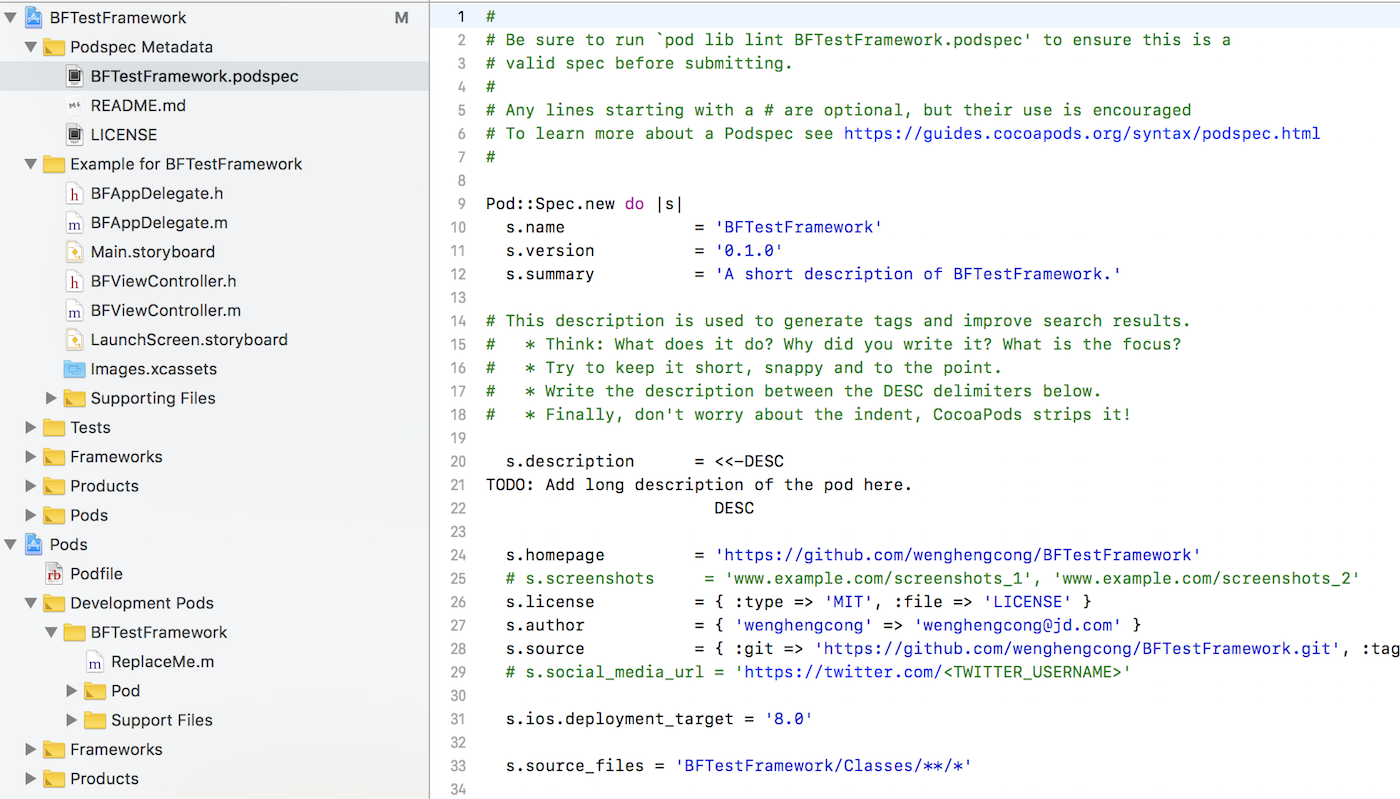
那么,如何在一个工程里维护库源码,而且集成一个 Demo app,最好自动化。
就是下面的命令,在 iOS:模块化(二)Cocoapods - 创建私有库有更详细的说明:
1
$ pod lib create BFTestFramework
以上路径中,Example–就是 Demo app 的可测试工程。对应源码在 Development Pods 中,所有以上,都在一个代码仓库中,可维护性极高。
打包
上面,我们通过将测试与库本身的开发都集中在 Cocoapods 中管理,同样的,我们需要打包,导出 Framework 也采用 Cocoapods 的工具。
1
2
3
4
5
// 安装`cocoapods-packager`
$ gem install cocoapods-packager
//打包
$ pod package BFDynamicFramework.podspec --force
其中 package 命令,打包成静态.a 文件:
1
$ pod package BFDynamicFramework.podspec --library --force
--force 是否覆盖原目录。
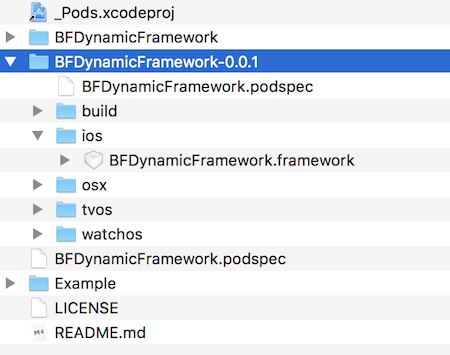
最后目录结果如下:
具体查看 BFDynamicFramework.framework 目录,和我们预想的一致:
1
2
3
4
5
6
7
8
9
10
11
12
13
14
15
$ tree -L 4
.
├── BFDynamicFramework -> Versions/Current/BFDynamicFramework
├── Headers -> Versions/Current/Headers
├── Resources -> Versions/Current/Resources
└── Versions
├── A
│ ├── BFDynamicFramework
│ ├── Headers
│ │ └── BFDeviceUtils.h
│ └── Resources
│ ├── G-symbol.png
│ ├── ItemView.xib
│ └── Media.xcassets
└── Current -> A
而且这种打包出来的格式,是 armv7 armv7s i386 x86_64 arm64 多架构的。
所以,这就是库开发的最佳方案之一。
多平台的 Swift-Framework
支持 macOS、iOS、tvOS 等平台的 swift framework。
避免入坑
1. 静态库中包含 “分类”
有时候,在静态库中,也是用了一些 Foundation 的分类,比如 UIImage+Clip 等。
此时需要前往:Build Settings->Other Linker Flags->-ObjC 或者-all_load
注意:是 - ObjC,而不是 - Objc
Other Linker Flags
三个参数:
| 符号 | 说明 |
|---|---|
| -ObjC | 链接器会把静态库中所有的 Objective-C 类和分类都加载到最后的可执行文件中 |
| -all_load | 链接器会把所有找到的目标文件都加载到可执行文件中,但千万不要注意,假如你使用了不止一个静态库文件,然后又使用了这个参数,那么你很有可能会遇到 ld: duplicate symbol 错误,因为不同的库文件里面可能会有相同的目标文件,所以建议在遇到 - ObjC 失效的情况下使用 - force_load 参数。 |
| -force_load | 所做的事情跟 - all_load 其实是一样的,但是 - force_load 需要指定要进行全部加载的库文件的路径,这样的话,你就只是完全加载了一个库文件,不影响其余库文件的按需加载 |
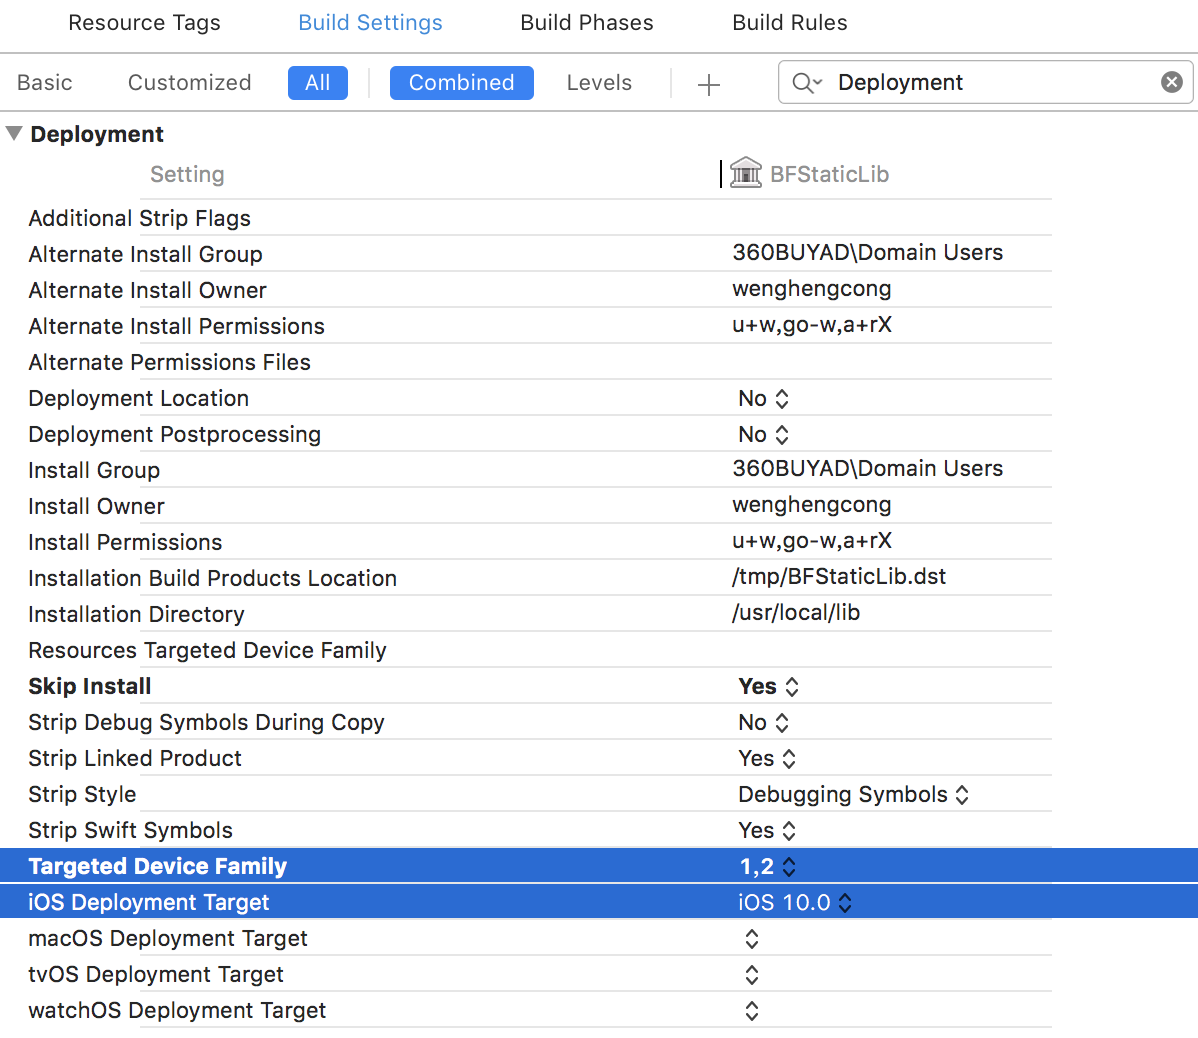
2. Deployment Target
注意静态库的使用环境,在什么设备上使用,支持最低什么系统版本等等。
Targeted Device Family:1 是 iPhone,2 是 iPad
iOS Deployment Target:支持的最低 iOS 系统版本
3. arm 多架构编译
a . 编译出错
首先了解苹果移动设备均采用 arm 架构的 CPU,而 Mac 则是 Inter 的 CPU。
假如入你在使用编译库中遇到报错:
在真机上编译报错:
No architectures to compile for (ONLY_ACTIVE_ARCH=YES, active arch=x86_64, VALID_ARCHS=i386).
在模拟器上编译报错:
No architectures to compile for (ONLY_ACTIVE_ARCH=YES, active arch=armv7s, VALID_ARCHS=armv7 armv6).
这个错,就是在编译静态库时没有配置正确的编译器指令造成的,此时需要设置正确的架构。
b. 设备指令集
针对苹果移动设备,都采用 arm 处理器的指令集,这些指令集都是向下兼容的,例如 armv7 指令集兼容 armv6,只是使用 armv6 的时候无法发挥出其性能,无法使用 armv7 的新特性,从而会导致程序执行效率没那么高。
还有两个我们也很熟悉的指令集:i386|x86_64 是 Mac 处理器的指令集,i386 是针对 intel 通用微处理器 32 架构的。x86_64 是针对 x86 架构的 64 位处理器。所以当使用 iOS 模拟器的时候会遇到 i386|x86_64,iOS 模拟器没有 arm 指令集。
此时一般需要合并静态库,以支持多指令集。
| 指令集 | 设备 | 说明 |
|---|---|---|
| armv6 | iPhone, iPhone2, iPhone3G, 第一代、第二代 iPod Touch | |
| armv7 | iPhone3GS, iPhone4, iPhone4S iPad, iPad2, iPad3(The New iPad), iPad mini iPod Touch 3G, iPod Touch4 | |
| armv7s | iPhone5, iPhone5C iPad4(iPad with Retina Display) | |
| arm64/armv8 | iPhone5S 及之后 iPhone iPad Air, iPad mini2(iPad mini with Retina Display) |
c. Xcode 编译选项
针对架构及编译指令集,Xcode 提供了一下选项:
| Xcode 设置项 | 定义 | 注意事项 |
|---|---|---|
| Architectures | 要支持的指令集 | 该选项指定了工程将被编译成支持哪些指令集。如果支持的指令集数目有多个,就会编译出包含多个指令集代码的数据包,从而会造成最终编译生成的包很大。 |
| Valid Architectures | 指即将编译的指令集 | 该选项指定可能支持的指令集,该 Valid architectures 列表和 Architectures 列表的交集,将是 Xcode 最终生成二进制包所支持的指令集。限制可能被支持的指令集的范围。 例如:Valid Architectures 设置的支持 arm 指令集有:armv7/armv7s/arm64,对应的 Architectures 设置的支持 arm 指令集有:armv7s,这时 Xcode 只会生成一个 armv7s 指令集的二进制包 |
| Build Active Architecture Only | 该编译项用于设置是否只编译当前使用的设备对应的 arm 指令集。 | Xcode 中设置: ①设置为 Yes, 编译速度更快,只编译当前的 architecture 版本 ②设置为 No,编译速度更慢会编译所有的版本 例如: 当该选项设置成 YES 时,你连上一个 armv7 指令集的设备 (iPhone5、5c),就算你的 Valid Architectures 和 Architectures 都设置成 armv7/armv7s/arm64,还是依然只会生成一个 armv7 指令集的二进制包。 |
4. Bitcode 支持
5. 避免重复引入
ld: 2 duplicate symbols for architecture x86_64
clang: error: linker command failed with exit code 1 (use -v to see invocation)
记住要给自己的库加上前缀,避免与其他第三方库,引用冲突。
6. 版本号如何制定
When to Use Major Versions
You should make a new major version of a framework or dynamic shared library whenever you make changes that might break programs linked to it. The following changes might cause programs to break:
Removing public interfaces, such as a class, function, method, or structure
Renaming any public interfaces
Changing the data layout of a structure
Adding, changing, or reordering the instance variables of a class
Adding virtual methods to a C++ class
Reordering the virtual methods of a C++ class
Changing C++ compilers or compiler versions
Changing the signature of a public function or method
When to Use Minor Versions
You should update the version information of your framework when you make any of the following changes:
Add a class
Add methods to an Objective-C class
Add non-virtual methods to a C++ class
Add public structures
Add public functions
Fix bugs that do not change your public interfaces
Make enhancements that do not change your public interfaces
Any time you change the public interfaces of your framework, you must update its compatibility version number. If your changes are restricted to bug fixes or enhancements that do not affect the framework’s public interfaces, you do not need to update the compatibility version number.

